Introduction
Office relocations are routinely underestimated as IT projects. The furniture gets planned months out. The cabling gets scheduled two weeks before move-in — if it gets scheduled at all.
That's where things go wrong.
Network cabling for a commercial relocation involves coordinating ISP provisioning timelines, structured cabling design, multi-system integration (VoIP, PoE devices, security cameras, wireless access points), and construction sequencing, all against a fixed move-in date. Miss any one of those dependencies and the consequences compound fast.
This isn't work for a general IT staffer or a moving crew. It requires certified cabling contractors or senior infrastructure engineers with hands-on structured cabling experience.
Rush or deprioritize the cabling, and the pattern of failures is predictable: network downtime on Day One, Wi-Fi dead zones in the wrong rooms, unlabeled cable runs that take hours to trace, and expensive rework in an occupied space.
ITIC's 2024 downtime survey found that one hour of downtime exceeded $300,000 for 90% of midsize and large enterprises surveyed. For businesses that go dark on moving day, that's not a hypothetical — it's a real exposure.
This guide walks through every phase of a commercial office relocation cabling project, from pre-move prerequisites through post-installation validation.
Key Takeaways
- Start ISP coordination 3–6 months before the move; dedicated fiber circuits can take 60–120+ business days to provision
- Map every network drop — workstations, VoIP phones, APs, cameras, printers — from the floor plan before pulling a single cable
- Use the move to upgrade to Cat6 or Cat6A — installation in an empty space costs far less than retrofitting later
- Test, label, and validate every cable run before employees arrive
- A single-source contractor reduces the coordination failures that cause most relocation delays
Pre-Move Cabling Planning: Prerequisites and Site Readiness
Cabling cannot begin until specific pre-conditions are in place at the new site. Trying to sequence installation before these are confirmed causes rework, schedule slippage, or both.
Minimum prerequisites before installation begins:
- Move date confirmed with access to the new space
- Floor plans available showing department layout and equipment placement
- ISP selected and provisioning timeline obtained in writing
- MDF/server room location confirmed with adequate power and cooling
- Conduit pathways identified and approved by building management
- Plenum-rated cable confirmed for any runs sharing environmental-air spaces (per NFPA 70 Articles 800.113(B) and (C))
Of these, ISP provisioning is the one that most consistently delays move timelines — and the one teams address last.
ISP and Carrier Lead Times
Start carrier conversations before anything else. Windstream Enterprise's installation guide lists target intervals ranging from 30 business days for GPON broadband to 120 business days for dedicated ILEC or Ethernet point-to-point circuits. Site conditions, building entry work, and landlord access requirements can extend any of those timelines.
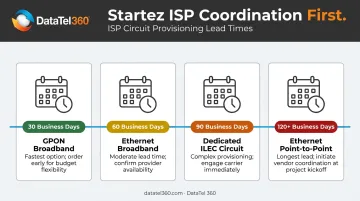
Before finalizing a move date, determine which carriers are already "lit" in the building. On-net buildings can activate service weeks faster than locations requiring new fiber construction. Get a written carrier target date, confirm where the demarcation point lands, and build your cabling schedule backward from that date.
Floor Plan and Equipment Mapping
Every network drop location needs to be identified on the floor plan before procurement begins. This mapping should cover:
- Workstations and dedicated desk positions
- Conference rooms (data drops, display connections, VoIP)
- Wireless access points
- VoIP phones
- Printers and copiers
- Security cameras and access control interfaces
- Break rooms, reception areas, and high-traffic Wi-Fi zones
Overlooking secondary areas — particularly break rooms and open collaboration zones — is one of the most common and avoidable planning mistakes in commercial relocations.
Cable Standard Selection
| Standard | Frequency | Best Fit |
|---|---|---|
| Cat5e | 100 MHz | Legacy; avoid for new installations |
| Cat6 | 250 MHz | 1GBASE-T to 100m; solid for most office endpoints |
| Cat6A | 500 MHz | 1GBASE-T and 10GBASE-T to 100m; recommended for AP runs and high-capacity links |
ANSI/TIA-568.1-E recommends at least two Cat6A or higher runs to each wireless access point for new installations. For offices deploying Wi-Fi 6 or 6E, or where PoE demand is high, Cat6A is the more practical long-term investment.
An office relocation is the single best opportunity to upgrade cabling standards. Running cable through an empty space, before furniture and staff arrive, is faster and less constrained than any retrofit in an occupied building.
Step-by-Step: How to Execute Network Cabling for an Office Relocation
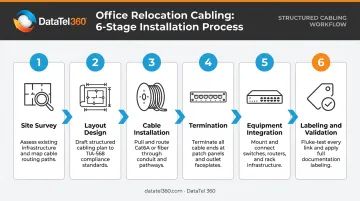
Office relocation cabling follows a defined sequence: site survey → layout design → cable installation → termination → active equipment integration → labeling and validation. Compressing or skipping any phase creates problems that compound on moving day.
Step 1: Conduct a Professional Site Survey
A thorough site survey involves walking the new space with a certified cabling contractor to document:
- Existing infrastructure and any cabling worth evaluating for reuse
- Pathway routing options: walls, ceilings, raised floors, conduit, cable trays
- Server room location, power availability, and cooling capacity
- Building-specific constraints: concrete walls, HVAC conflicts, asbestos in older construction
- Measured cable route lengths (the recognized copper permanent link is 90m/295ft, per TIA standards — floor-plan straight-line distances consistently underestimate actual run lengths)
A wireless site survey should run concurrently. This identifies existing RF interference, maps signal propagation across the floor plan, and determines optimal AP placement before the installation crew pulls a single cable.
Step 2: Design the Structured Cabling System
A proper structured cabling design documents every cable run, drop location, patch panel layout, and equipment rack placement in a network diagram. This is the project blueprint, and it should reflect current requirements plus anticipated growth.
Build in spare capacity beyond today's headcount. Adding drops to an occupied, furnished office is the most expensive cabling problem there is — one that upfront planning eliminates entirely. For businesses in high-growth sectors (healthcare, legal, multi-location enterprise), this forward planning pays for itself quickly.
DataTel 360's certified engineers provide design-build value at this stage, translating floor plans into a complete infrastructure specification before any installation begins, with Fluke-certified testing and as-built documentation as standard project deliverables.
Step 3: Pull and Route Cable Infrastructure
Physical installation runs horizontal cable from the MDF/server room to each drop location through walls, ceilings, conduit, or cable trays. Sequence matters relative to construction and furniture staging:
- In new construction: pull cable after electrical rough-in, before drywall closes
- In existing space: complete all cable pulling before furniture is installed
- Maintain correct bend radius throughout; sharp pinch points degrade signal and fail certification
- Confirm plenum-rated cable (CMP) for any runs in environmental-air spaces
Step 4: Terminate, Punch Down, and Organize the Patch Panel
Termination involves finishing cable ends at wall jacks and punching them down to patch panel ports in the server room. Poor termination is a leading cause of cable failure; this step requires a trained technician, not a field improvisation.
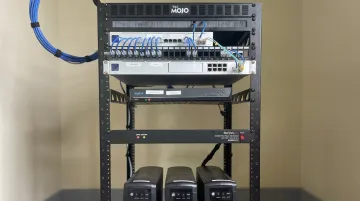
Rack organization best practices:
- Sequence patch panel ports to mirror the floor plan layout
- Dress patch cords with appropriate slack and consistent routing
- Manage horizontal and vertical cables within the rack using proper cable management hardware
- Label every panel port to match the network diagram
Step 5: Integrate with Active Network Equipment
With passive infrastructure complete, active equipment connects the network:
- Switches patched to the patch panel
- PoE switches for VoIP phones and access points
- Firewall/router installation and ISP hand-off confirmation
- UPS battery backup for critical equipment
VoIP phone systems require PoE-capable switches. Access points should each have a dedicated cable run, with Cat6A specified for Wi-Fi 6/6E deployments. Confirm the ISP circuit is active and properly patched into the network before signing off on this phase.
Step 6: Label Everything Systematically
Every cable end at the wall jack and the corresponding patch panel port gets labeled with a consistent identifier before the project closes. Both ends. Every run.
On moving day, unlabeled infrastructure is one of the primary causes of multi-hour troubleshooting delays. When 40 people are waiting for their workstations to connect, tracing an anonymous cable run is not where you want the project team spending its time.
Post-Installation Testing and Validation
Testing must happen before employees arrive. Problems found in an empty office take minutes to correct. The same problems found after move-in take hours to fix, and that downtime has a real cost.
Cable Certification Testing
A full cable certification test (per ANSI/TIA-1152-A) produces a pass/fail result for every installed link. A complete copper closeout package should include:
- Wire map and length for every run
- Insertion loss, NEXT, return loss, and delay measurements
- Pass/fail result against the applicable TIA category limits
- Electronic report from the test instrument (Fluke DSX series is the standard for Cat6/Cat6A certification)
Require this report from your cabling contractor before releasing final payment. That documentation serves as your quality baseline and supports any future warranty claims.
Network Connectivity and Wireless Validation
Beyond cable certification, verify active performance:
- Port-by-port connectivity check: Connect a laptop to each active jack and confirm DHCP assignment, internet access, and expected speeds
- Wireless coverage survey: Walk the office with a Wi-Fi analyzer to confirm full signal coverage, identify any dead zones, and verify seamless AP roaming
Wireless validation is critical for offices running VoIP phones, video conferencing, or wireless-first devices. Dead zones found after the move require AP repositioning around furniture, ceiling tiles, and active users — far harder to resolve than catching the same issue in an empty space.
Red flags requiring correction before go-live:
- Intermittent connectivity on specific ports
- Speeds significantly below expected bandwidth
- Wi-Fi dropping in specific rooms or zones
- PoE devices failing to power on
Common Network Cabling Problems During Office Relocations — and How to Fix Them
Insufficient Cable Drops
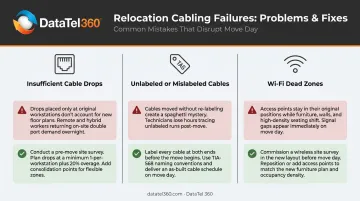
Problem: Employees arrive and there aren't enough active ports — shared workspaces, conference rooms, or added equipment weren't accounted for in the original design. This usually happens when the cabling layout was based on the old office footprint rather than the new one, or headcount growth wasn't factored in during design.
Fix: During planning, build capacity assumptions into the design. Account for:
- Seat growth projections (plan for 12–18 months out)
- IoT devices, printers, and IP cameras
- Conference room AV equipment
- Flexible or hotdesk configurations
If the gap is discovered post-installation, surface-mount raceways can add drops without opening walls — but they cost more and look less clean than cable run in empty space.
Unlabeled or Mislabeled Cables
Problem: Moving day arrives and the team can't identify which port connects to which desk, turning a simple plug-in into hours of trial-and-error troubleshooting. Labeling was either skipped or done inconsistently, with no network diagram maintained to match physical labels.
Fix: Enforce dual-end labeling during installation — both the wall jack and the patch panel port, using a consistent identifier. Pair this with a printed or digital network diagram that maps port IDs to physical locations. Keep this document with your IT team and update it after any infrastructure changes.
Wi-Fi Dead Zones in the New Office
Problem: Employees report weak or no signal in certain areas — often conference rooms, corners, or spaces separated by structural walls or dense building materials. AP placement is frequently carried over from the old office without a fresh site survey, or the new floor plan simply requires more APs than were deployed.
Fix: A post-installation wireless survey in the new space takes a fraction of the time you'll spend diagnosing dead zones after move-in. Conduct the survey before furniture arrives — signal behavior changes once the floor is populated. Each AP also needs a dedicated cable run; daisy-chaining APs degrades performance significantly and is a common shortcut that creates problems at scale.
Pro Tips for a Smoother Office Cabling Project
Complete cabling before the move, not during. The single most impactful scheduling decision is finishing all cabling work while the new space is unoccupied. Target completion at least two to four weeks before move-in. This leaves time to test, correct any issues, and verify active network performance before the first employee walks in.
Plan for future growth, not just today's headcount. Technology needs expand faster than most teams anticipate. Pulling an extra cable run during installation costs a fraction of what it costs to retrofit drops in a furnished, occupied office. Build growth assumptions into the initial design, accounting for:
- Team headcount increases over 3-5 years
- IoT device expansion (access control, cameras, sensors)
- Higher wireless density as device counts climb
- Additional VoIP handsets or conference room endpoints
Document the installation and require a test report before sign-off. Every cable run, port assignment, and active equipment connection should be captured in a network diagram delivered to the IT team at project close. Requiring a certification test report before final payment creates contractor accountability and becomes invaluable for future troubleshooting, expansions, or audits.
Know when to bring in a specialist. Basic patch cabling can be handled in-house. A full structured cabling installation — involving fiber runs, PoE infrastructure, VoIP integration, and multi-floor routing — requires a certified contractor with the experience to sequence the work correctly and avoid costly rework.
For Atlanta and Southeast businesses, DataTel 360 manages the entire cabling scope under one project team, which eliminates the handoff gaps between vendors that cause most relocation delays.
Frequently Asked Questions
How far in advance should I schedule network cabling for an office move?
Cabling installation should be scheduled at least 8–12 weeks before the move date. The broader planning process — including ISP provisioning, site surveys, and design — should begin 3–6 months out, since dedicated fiber circuits can require 60–120+ business days to provision depending on the carrier and building infrastructure.
What cable type should I use when setting up a new office — Cat5e, Cat6, or Cat6A?
Cat6 handles most standard office endpoints at 1GBASE-T to 100m. Cat6A is recommended for wireless access point runs, high-density wireless environments (Wi-Fi 6/6E), and anywhere a longer infrastructure lifecycle is the goal. An office relocation is the right time to upgrade — installation in an empty space is significantly less constrained than retrofitting later.
Can I reuse the existing cabling in my new office space?
Sometimes. Existing cabling is worth evaluating if it meets current standards and passes a certification test. Older Cat5 or unknown-quality cabling often doesn't support modern PoE requirements or higher-bandwidth applications. A site survey and cable certification test will determine what's worth keeping versus replacing.
How long does it take to install network cabling in a commercial office?
A small office with 20–30 drops may take 1–2 days. A larger multi-floor installation can take 1–2 weeks depending on complexity, pathway routing, and the number of drops. Without adequate lead time before move-in, testing and validation get compressed — which is where most Day One problems originate.
Do I need a wireless site survey when relocating my office?
Yes — both pre-installation to plan AP placement and post-installation to verify coverage and identify dead zones. This is especially important for offices using VoIP phones, video conferencing, or wireless-first device environments where connectivity gaps directly affect business operations.
What happens if network cabling isn't tested before employees move in?
Untested cabling surfaces problems during active business hours: wrong port mappings, connectivity failures, PoE devices that won't power on, and Wi-Fi gaps that take hours to diagnose in a live space. Pre-move testing catches these issues when the floor is empty and fixes are fast.